| Frequently Asked Questions about Product Photography | |
   | |
Why are my pictures blurry?
Blurry images are generally due to one or all of the following three causes. The subject was not in focus, the camera was moving at the time of the exposure, the image was captured at too low a resolution.
Out of focus images are by far the biggest problem with most of the images we see on the internet, we strongly urge you to learn to focus your camera. It will probably require you to dig out and spend some time with your camera's user manual. But learning to focus your camera is going to be time well spent. Understanding how your camera's auto focus works and knowing when to use your camera's macro focus setting are absolutely essential to taking good product shots. Correct focus is the single most important factor for a good product shot. [Camera focus and the closely related subject of depth of field are covered in detail in our resources section and you can find much more about those subjects there.]
A blurry image due to camera motion is also a very common problem. Using a sturdy tripod along with the camera's self timer or remote will eliminate motion blur from images in most cases . [ In the case of very close-up photography motion blur can be caused by the subject itself moving. That motion can be reduced by making sure the subject is on a solid surface.]
A less common cause of blurry images is shooting the image at too low a resolution. Many people assume that since an image is going to end up on a web page as a low resolution image, it's OK to take a low resolution image to start with. Not true. Even if you will use a small 320 x 200 size image on a web page your should still shoot the image at two mega pixels or more. This doesn't mean you need to be shooting with an expensive camera with a resolution of four, five or even more mega pixels, it just means that you should shoot at high resolution resolution whenever you do capture an image. [Camera memory is now very inexpensive, so if you are worried about filling up your camera's memory card, purchase another memory card with more capacity.]
The reason why it's necessary to shoot an image at a higher resolution than you will eventually use is that a lot of the detail of an image is lot as the image is cropped, edited, resized and saved. Most shots need to be cropped, but the process of cropping an image reduces the image size considerably. Most shots also need at least a little adjustment, any adjustments you make will cause additional loss of detail. When an image is resized still more detail is lost. And finally, simply saving a JPG format image will cause yet another loss of detail. This means that the original image you captured has lost a lot of detail by the time you eventually place it on a web page. That doesn't mean that you should avoid cropping, resizing and adjusting your image, since each of those steps can greatly improve an image. It does mean that you want to start out with a high resolution image so that the final image still has plenty of detail even after any editing you do. Excellent images can be obtained from inexpensive two mega pixel cameras, but it's important to have a camera set to a high resolution mode image when you are taking the picture.
Yes, the steadiest hand is not nearly as steady as a tripod. Using a tripod is especially important for product photography since product shots often use slow shutter speeds. An inexpensive tripod will produce clearer product shots than a shot taken with a hand-held camera. But a sturdy tripod is a good investment that will last for many years.
To completely eliminate motion blur from your images, we recommend you go a step further and use your camera's self timer or remote control. Even when a camera is mounted on a tripod there is some movement at the time the shutter button is pushed. Using a self timer or remote will eliminate that motion.
Yes. A tripod with horizontal arm, solves the problem of positioning a camera for shooting straight down on a subject. They also function as a standard tripod when the arm is positioned vertically or can be fixed at any angle between vertical and horizontal.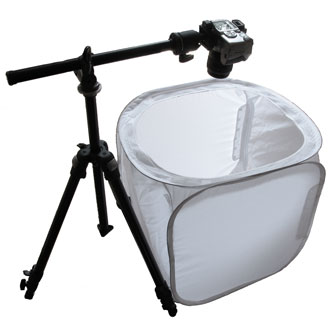 This is a special type of tripod which is more expensive than you may need for most product photography; However it is money well spent if you if you will be doing a great deal of flat art photography, plate or china photography, book photography, flat clothing photography or other types requiring an ability to support the camera in this position.
This is a special type of tripod which is more expensive than you may need for most product photography; However it is money well spent if you if you will be doing a great deal of flat art photography, plate or china photography, book photography, flat clothing photography or other types requiring an ability to support the camera in this position.If you only need to shoot horizontally on rare occasions, the arm can be removed entirely and the ball head can be mounted directly onto the tripod.
The good news is, unless you are shooting close-up pictures of jewelry, you don't need an expensive camera to take good product shots. If you are shooting pictures for use on websites and not for print, you can get a good camera for less than $200. The quality of your images is going to depend much less on the sophistication of your camera and much more on your lighting and how well you operate the camera. (For examples of images taken with an inexpensive two mega pixel camera take a look at this page.) Most of the images on our web site were taken with cameras that have six mega pixels or less. One area where expensive cameras have a big advantage over the less expensive ones is close up pictures of jewelry (for the reasons why, please read the section section below which covers choosing a camera for close-up, jewelry photography).
What is the best digital camera to buy for product photography?
The features that make a good camera for product photography are not necessarily the features that are important for other types of photography like portraits or everyday family photos. That's not to say that the camera you choose for product photography won't work well for other uses, but you may weight the relative importance of the various features differently. For example, when choosing a camera for vacations it might be important to find a camera that fits in your pocket, or a camera with a big optical zoom range. Neither of those features is important for product photography.
Our advise for choosing a camera for product photography depends on if you intend to take close-up pictures of jewelry or if you intend to take pictures of larger subjects. A good camera for larger subjects may not have all the features you will need for close-up jewelry photography. We will first look at choosing a camera for general purpose product photography, then we will look at the specialized needs of close-up jewelry photography.
Choosing a digital camera for subjects other than close-ups of jewelry
If you don't want to spend time reading about the important features, studying the list and making a comparison table before deciding which camera is the perfect camera for you, then we would suggest you buy a camera from the Canon PowerShot A or PowerShot S series. The Canon PowerShot A590 IS is a nice camera that sells for about $150. The Canon S5 IS is a great camera that sells for less than $350. These are by no means the only good cameras for product photography. There are lots of great cameras on the market, and it's hard to go wrong if you spend at least $150 for a recent model name-brand camera. We recommend the Canon PowerShot cameras simply because they are affordable, widely available, have an excellent set of features for product photography, and we use them ourselves. Another feature of the Canon camera which we find very useful for product photography is the ability to shoot with the camera attached (tethered) to a computer. (We used an older generation PowerShot A75 for many of our web shots. Our watch images were shot with a Canon PowerShot S2 IS).
If you want to spend a lot of time (and probably agony) comparing various features to select the ideal camera here are the features we think are most important for product photography.
Megapixels - if the images are only for use on the internet, 5 megapixels are plenty. If the images will end up in print, then it is better to use a camera with 8 or more megapixels.
Optical zoom - you don't need a lot of zoom range, but a zoom can often save you time when composing your shots. At least a 3X optical is good, more is unnecessary. Digital zoom is a meaningless marketing feature, so don't even bother to compare digital zoom features.
LCD screen size - It's nice to have a larger LCD view screen. All things being equal, when it comes to LCD view screens, bigger is better. But all things aren't equal and going from a 2.5" screen to a 3" screen will add cost to the camera. Even with a 3" view screen you will still need to look at your images on a computer to see if they are in focus, so it's not important to spend more for a bigger screen.
A swiveling LCD screen can be useful, especially when using the camera to shoot straight down. It is an expensive feature though. so unless you imagine that you will be shooting straight down or from some unusual angles, you won't need a swiveling LCD screen.
Custom white balance - Most cameras now have a several white balance settings. Custom white balance (also called Preset White Balance) is the best. If you love a particular camera and it doesn't have custom white balance, then you can live without it. But if you are making the choice between two cameras and one has custom white balance and the other doesn't, select the one that offers custom white balance.
Size - Usually it is easier to work with a larger size camera for product photography than a tiny camera. This doesn't mean you need to look for a huge camera, but it means you can probably save yourself some money since smaller cameras usually cost quite a bit more than larger cameras with a similar set of features. Since you will be using the camera on a tripod, if you have the opportunity, put the camera on a tripod and see how it feels on a tripod.
Memory card access - Most cameras make it easy to remove the memory card while the camera is still mounted on a tripod. Others require the camera to first be taken off the tripod before removing its memory card. We recommend you avoid cameras that don't allow access to the memory card while the camera remains mounted on a tripod.
Features that don't matter as much for a digital camera that will be used primarily for product photography.
Battery type - Cameras that use rechargeable AA batteries are usually less expensive than cameras that use proprietary lithium-ion batteries. Either type of battery works fine, but cameras that require AA batteries normally don't include rechargeable batteries or a battery charger, so you will need to factor in the cost of a couple of sets of batteries and a battery charger. (Greenbatteries.com is our favorite rechargeable battery supplier).
Included memory and memory card type - Most cameras don't include a descent size memory card to start with, so plan on purchasing more memory. Memory is getting very inexpensive and you should buy at least two 1 GB cards. There's not a lot of price difference in the different types of memory cards (Compact Flash and Secure Digital are currently the most popular); so the the type of memory card a camera uses shouldn't be too big of a consideration. The only exception is Sony Memory Stick™ cards. Sony is getting a premium for it's memory, so keep that in mind when looking at Sony cameras.
Docking stations - We have never used a docking station and don't really see the advantage of them. You will normally get the images from your camera to your computer by removing the memory card, in which case a docking station has no benefit.
Lots of different picture modes - Some cameras seem to be competing on the number of picture or scene modes they have. The only modes you will need are Program, Aperture Priority, and Manual. All cameras should all have at least those three modes. Don't worry about Night Modes, Sports Modes, Portrait Modes, Underwater Modes, Sunset Modes or any of the other modes that the camera marketing types have thought up. Those modes may be useful for family snapshots, but you won't use them for product photography.
Bundled software - We like Adobe Photoshop Elements. If it's included with your camera that's a plus. If not, then you will need to purchase it, or a similar program for around $80. Other than Photoshop Elements, look for software to be included that allows you to tether your camera to your computer for controls. This is very handy software that allows you to control your camera from your computer. Tethered shooting can be a huge time saver if you need to shoot lots of images.
Choosing a camera for close-up jewelry photography.
Please note that the title of this section includes the words close-up. If you will not be shooting jewelry close-up, that is if you are not trying to fill the image with a single ring, pendant or gemstone, then our general advise for choosing a digital camera for product photography applies. However, if you intend to really "zoom-in" on small pieces of jewelry, especially shiny jewelry, then the following advise will apply.
The short version -
If you hate reading long passages and just want a camera recommendation without a lot of explanation, then just get a Nikon D60 or Canon Digital Rebel XSi. These cameras sell for about $700. Very good close-up lenses for these cameras would be a Nikon 105mm micro lens or Canon 100mm macro lens (about $500 for the lens alone, ouch!) Because the lenses that come bundled with these cameras change so frequently, it is hard for us to advise whether the bundled lenses will work well for you or not. But it is probably best to get the camera together with a bundled inexpensive zoom lens. For close up jewelry photography you will need a lens that can focus as close as 15" when it is set to the 80-100mm range.
The choice between Nikon and Canon is often more of a religious choice than a technical one. Some folks swear by Nikon, others believe that Canon cameras are the best. Both make excellent cameras. One feature that makes us lean more towards Canon SLR cameras is that Canon cameras come bundled with the software necessary to control a camera directly from a computer. That is called tethered shooting. Both Nikon and Canon cameras can shoot in tethered mode, but Canon included the necessary software, while Nikon sells the software for an additional $200. Tethered shooting can be a huge time saver if you need to shoot lots of images.
The longer version -
The most important feature to look for when choosing a digital camera for close-up jewelry photography is the ability to focus the camera manually. Manual focus capability is essential because most auto-focus cameras simply can't "lock-on" precisely enough on a small shiny piece of jewelry. The camera's auto focus mechanism depends on finding parallel lines on a non-reflective surface. Most jewelry has curved lines rather than straight lines and most jewelry has very reflective surfaces. The gemstones used in jewelry may have straight lines, but their surfaces are reflective and don't make good auto-focus targets. Even if a piece of jewelry does have straight lines and a dull surface, unless those lines are at the exact spot you want to focus on, they won't be of any help. The bottom line is that close-up images of jewelry require manual focus.
Unfortunately, digital cameras with true manual focus are quite a bit more expensive than point-and-shoot type digital cameras. Many point and shoot cameras claim to have manual focus, but their manual focus mechanism is far too coarse for a small jewelry subject. Generally, in order to get a true manual focus, you will need to get a SLR (Single Lens Reflex) type digital camera. SLR cameras, although they are expensive, do have additional features, like interchangeable lenses, that make them more useful for jewelry photography.
SLR cameras also allow for smaller apertures (the f numbers) than point and shoot cameras. A smaller aperture, indicated by a bigger f number, allows for a greater depth of field. A greater depth of field simply means that more of the subject can be in focus at the same time.
Since SLR cameras have interchangeable lenses, purchasing a SLR camera raises a new issue, which lens to purchase. When choosing a lens for close-up jewelry photography, an important feature is the ability to macro focus at a longer focal length. (In plain English that means that you want to be able to get a close-up image without being too close to the subject). We prefer to shoot small jewelry pieces with lenses that are at about 100mm. A 100 mm lens will allow you to fill the viewfinder with a ring and still be over a foot away from the ring. You might find that with a point and shoot camera's limited macro range to get a good close-up shot of a ring or small pendant the camera needs to be just a couple of inches away from the subject. A camera that is too close to the piece of jewelry won't allow the gemstones in the jewelry to be properly lit. (For more on lighting loose gemstones see our Gemstone Jewelry How To).
Although it's considered an accessory rather than a feature, get a remote shutter release for your camera. Jewelry photos are more likely to show camera movement than photos of larger subjects. The combination of close-up images, a longer focal length lens, a slow shutter speed (because of the smaller aperture) all combine to exaggerate even the tiniest amount of motion blur. A remote shutter release will help to eliminate some of the motion blur.
And finally get a sturdy tripod. SLR cameras are heavier than point-and-shoot cameras, so they require sturdier tripods. The sturdier tripod will also help to eliminate the motion blur mentioned in the previous paragraph. You will loose most of the benefit of an expensive camera and lens if you use a flimsy tripod.
Camera makers make it tough to decide how many megapixels you should buy. They seem to always have a couple more megapixels available for "just" a few hundred dollars more. All things considered more megapixels is always nice for close-up photography. But if more megapixels is putting a strain on your budget, then stop at 8-10 megapixels. If we had to choose between a 12 mega pixels SLR with a cheap lens and an 8 mega pixel SLR and a high quality lens, we would go with the 8 mega pixel camera and better lens.
The key features to look for when selecting a digital camera for close-up jewelry photography
Feature Purpose/Benefit
Manual focus Maximum control over focus for small objects
Long focal length macro lens
(at least 100 mm) Allows more room for a sparkler light to "light up" faceted stones while still getting a good close-up image
Remote shutter release Reduces motion blur caused by pushing an on-camera shutter release
More mega-pixels
Allows for larger image without decreasing the depth of field
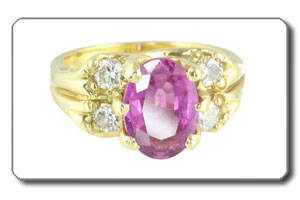
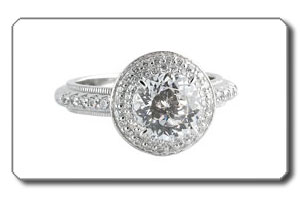
Glare, hot spots, or "burned out" areas on an image are caused by direct light that is reflected off the shiny surface of an object back into the camera. This same direct light produces very dark, distracting shadows.
How do I get rid of glare, "hot spots" and dark shadows?
Left:"Hotspots" on the pink saphire hide the facets | Right: "no glare" allows a clear view of the diamond cut |
 |  |
Glare can be eliminated by either moving the light source or softening the light source. The solution to glare problems in photographs depends on the shape of the subject. In the case of flat objects (like a painting covered by glass) the solution is simply to move the light source. However, if the subject, is like most objects and it has angled or rounded surfaces and edges, the solution requires softening the light since no matter where the light is positioned some of it will reflect back into the camera.
Note that softening the light source does not mean reducing the light source or decreasing the amount of light. Turning down the lights will not eliminate glare from an image, at best it will only reduce the size of the hot spot appearing the image. Softening the light means changing the light source from a direct or hard light source (a bare light bulb or the sun are typical hard light sources) to a diffuse light source. The standard way to soften light is to use a diffuser or bounce the light off a large surface.
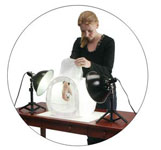
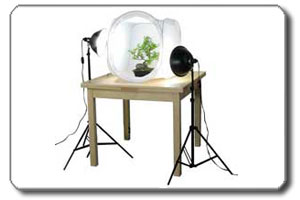
For many objects the easiest way to light an object with soft (diffuse) light is to use a light tent like the EZcube. Placing an object inside a light tent allows direct or hard light to be diffused as it passes through the fabric of the tent and then to be further softened as it is reflected around inside the tent. If all the light which is illuminating an object first passes through the fabric of the light tent then all the glare should be eliminated from the image of the object.
The most common cause of glare and extreme shadows, is an on-camera flash. If you are shooting an image of a shiny object using an on-camera flash, there is almost nothing you can do to eliminate glare. Even a light tent will not eliminate the glare caused by an on-camera flash. So, unless you have a special type of flash and have a very specific reason for using it, you should turn the on-camera flash off for most product photography.
No, strobes or flashes are not required for product photography, continuous lights work well and are actually better than strobes for most tabletop photography. Portrait photographers often use strobes or flashes because the the subject is moving and the short duration of a flash is needed to eliminate blur caused by motion. Product photography typically involves stationary objects that are not moving so the ability of a strobe to freeze motion is not required.
Continuous lights typically put out much less light than strobe lights, but this is not a problem since decreasing the shutter speed will offset the lesser quantity of light. And since the subject is not moving the slower shutter speed does not cause motion blur (assuming you are using a tripod).
Built-in camera flashes rarely produce good product shoots. They cause a number of problems for product photographers. The position of the on-camera flash is likely to create glare or "hot spots". The light from an on-camera flash is normally very hard and creates harsh shadows. And the close proximity of the flash to the camera's lens also makes for flat looking images. Built-in camera flashes are really designed for snap shots of people and should normally be turned off for product photography. (When turning off an on-camera flash make sure your camera is not in "auto-flash" mode since it may still be turning your flash on when you don't want it on).

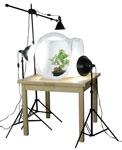
We recommend photo flood light fixtures with daylight balanced compact fluorescent bulbs. The photo flood fixtures are easy to adjust and they stay locked in position. Professional models are available in floor standing or smaller tabletop sizes. Daylight balanced compact fluorescent bulbs produce a nice white light that requires little or no color correction and they have a very low heat output which makes them easy to work with.
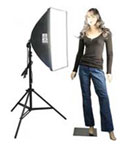
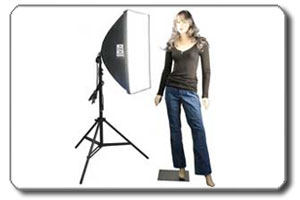
For good results you will want soft lighting, below are the best two ways to get it. Consider your work space size when making your decision. Using a light box makes the most sense for a small space, and also provides a background. Both light choices below can accomodate the daylight bulbs mentioned above.
Left: The EZcube diffuses & softens the lights | Right: A "soft box" diffusion cover softens the light |
 |  |
The EZcubes come in five sizes created for a range of uses, 12", 20", 30", 40" and 55". Our recommendations for the size you need for your job at hand is to always be sure there is empty space surrounding your product once placed inside the EZcube. If your item is too tight a fit then it will be difficult to crop the light tent out of your final image.
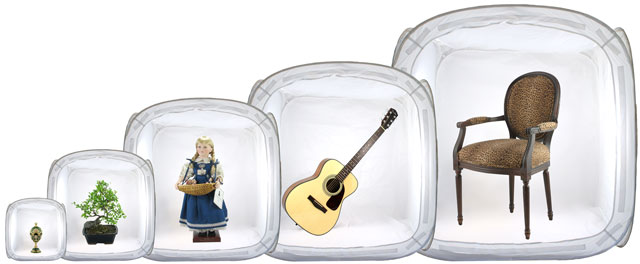 | ||||
12" EZcube | 20" EZcube | 30" EZcube | 40" EZcube | 55" EZcube |
For items up to 9" tall | For items up to 16" tall | For items up to 24" tall | For items up to 34" tall | For items up to 45" tall |
Tall subjects like the 42" guitar in the above example can be rotated to a diagonal position to maximize the use of space inside the EZcube. It's easy to run invisible thread from grommets on one side of the EZcube to the grommets on the other, to hold the larger item in position.


